-")
Breast Augmentation (Fat Graft)
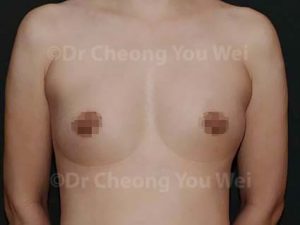
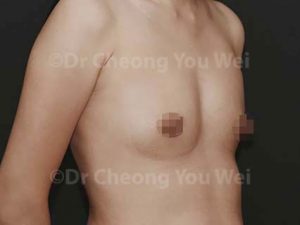
Before After
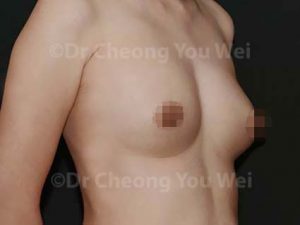
Before After
Autologous Fat Transfer Breast Augmentation: A Natural and Safe Choice for Breast Enhancement
Breast enlargement can be achieved not only through implants but also by using the patient’s own fat. This method, known as autologous fat transfer breast augmentation, involves transferring excess fat from other areas of the body to the breasts—enhancing both volume and shape and for a soft, natural feel.
The first step of the procedure is liposuction from donor sites with sufficient fat, most commonly the abdomen and thighs. During fat extraction, the surgeon may also contour the donor area to improve body shape. To ensure high cell viability and survival, gentle, low-trauma techniques are used throughout the process. The harvested fat is then purified—removing blood, oil, and excess fluids—to obtain high-purity fat suitable for injection. During fat injection, a specialized fat-grafting injector is used to deposit tiny droplets of fat evenly and preciselyinto the breast tissue in multiple layers. This meticulous technique promotes fat cell survival and integration with the existing breast tissue.
Compared with traditional implant augmentation, autologous fat transfer offers several advantages:
1. Natural material – Uses your own fat, eliminating foreign materials and reducing risks of rejection or capsular contracture.
2. Minimally invasive and fast recovery – Only tiny punctures are needed; scars are nearly invisible and downtime is short.
3. Dual sculpting benefit – One procedure achieves both liposuction slimming and breast enlargement.
4. Natural feel – Results in soft, realistic breasts—ideal for those seeking authenticity.
5. Fine adjustment – Allows correction of mild asymmetry or contour irregularities, improving overall aesthetics.
However, fat transfer also has its indications and limitations.
Patients must have adequate fat reserves for harvesting. The increase per session is moderate—usually about one cup size. For more dramatic enhancement, implants may be more suitable.
Not all injected fat cells will survive—some are absorbed within weeks to months. The retention rate varies among individuals, influenced by factors such as surgical technique, fat processing method, body constitution, smoking habits, and postoperative care.
Therefore, selecting an experienced plastic surgeon and following pre- and postoperative instructions closely are key to achieving lasting, optimal results.
Preparation
1. Medical Conditions and Allergies
Inform your doctor of any pre-existing medical conditions or drug allergies. All medical conditions must be properly treated and stabilized before surgery.
2. Smoking
Stop smoking at least one week before surgery. Smoking impairs wound healing and significantly increases the risk of post-operative complications.
3. Medications and Supplements
Discontinue the following one week before surgery and continue avoiding them until one week after surgery:
a. Supplements: Avoid all supplements containing vitamin E, ginseng, ginkgo, garlic, fish oil, or any other substances that may increase bleeding. Stop any traditional medicine or herbal remedies with unknown ingredients.
b. Medications: Medications that may increase bleeding—such as aspirin, NSAIDs, and warfarin—should also be stopped. However, please consult your prescribing physician before discontinuing them.
4. On the Day of Surgery
- Wear simple and comfortable clothing.
- Do not wear any makeup, jewellery or metal objects on your face or body.
Your careful preparation is essential for a safe surgery and smooth recovery.
If unsure about anything, please contact your medical team.
Surgery Overview
Duration: Approximately 3–4 hours (varies by individual)
Anaesthesia: Local anaesthesia or general anaesthesia
Hospital Stay:
a. Local anaesthesia – hospitalisation is not required
b. General anaesthesia – usually a day-care procedure. After the procedure, observation is done for a few hours before discharge
Procedure Steps
1. Fat Harvesting: Fat is gently suctioned from areas like the abdomen or thighs—simultaneously shaping the body.
2. Fat Purification: Extracted fat is washed and purified to remove blood and excess fluids, leaving only healthy fat cells.
3. Fat Injection: Using a MAFT Gun™ injector, fat is injected in micro-droplets layer by layer into the breast for better survival and a natural look.
Postoperative Care Guide
What to Expect:
a. Swelling: Peaks around Days 2–3, then gradually subsides.
b. Mild Bruising: May appear and resolves within 1–2 weeks.
c. Breast Shape Changes: The breasts may appear full and firm during early post-operative period. The breasts will settle into their natural position and shape within 1–2 months.
d. Tightness: More common in patients with tight skin or larger volume of fat transfer; typically lasts 1–2 weeks。
Home Care Essentials
1. Wear Supportive Bras
♦ Duration: Wear continuously day and night for at least 4 weeks (or as directed), even during sleep.
♦ Purpose: Provides stable support, minimizes tissue movement, promotes healing, and shapes contours.
♦ Note: Ensure the bra fits snugly without excessive pressure. Avoid tight clothing that may compress the treated area and compromise fat survival.
2. Compression Garments
♦Wear compression garments over donor sites (e.g., abdomen/thighs) postoperatively to reduce swelling, minimize bruising, and assist skin adaptation to new contours. Continuous, uniform pressure improves circulation, helps drain excess fluid, supports healing, prevents seroma formation, enhances scar quality, provides comfort, and optimizes aesthetic outcomes.
3. Avoid Smoking & Alcohol
♦ Smoking: Strictly prohibited for at least 1 month, ideally for 6 months postoperatively. Nicotine constricts blood vessels, impairing circulation, delaying healing, increasing infection risk, and reducing fat graft survival.
♦Alcohol: Avoid for 2 weeks postoperatively to prevent interference with medication metabolism or exacerbating swelling.
4. Sleep Position
♦ Recommended: Sleep supine (on back) with upper body elevated 15–30 degrees (using pillows).
♦Avoid: Side-lying or prone positions to prevent undue pressure on breasts, which could displace fat or hinder wound healing.
5. Rest & Nutrition
♦ Rest: Ensure 7–8 hours of quality sleep daily; avoid staying up late.
♦ Diet: Consume protein-rich, vitamin C- and zinc-rich foods (e.g., eggs, fish, lean meat, fresh fruits/vegetables) to support tissue repair.
♦Hydration: Drink ample water daily to aid metabolism and reduce swelling.
6. Mental Adjustment
♦ Feeling worried or anxious after surgery is completely normal. Try to stay positive and give yourself time to heal. Deep breathing, gentle meditation, or listening to calming music can help you relax and feel more at ease.
Medication Guidance
1. Antibiotics
♦ Take exactly as prescribed—do not stop early or reduce dosage, even if symptoms improve, to prevent infection.
2. Pain Medication
♦ Take as needed for pain relief. Contact the clinic immediately if pain is severe or worsening.
♦ Avoid taking on an empty stomach to prevent gastric discomfort.
Wound Care Protocol
♦ Dressing Management: Replace dressings immediately if soiled by blood, sweat, or discharge. If necessary contact the clinic for assistance.
Follow-Up Schedule
♦ First Visit: Return to the clinic on Day 7 for wound assessment, implant positioning evaluation, and next-step guidance.
♦ Subsequent Visits: Based on individual recovery, follow-ups will be scheduled at Month 2 and Month 6 to ensure long-term safety and outcomes.
Emergency Situations
Contact the clinic immediately if you experience any of the following:
♦ Sudden heavy bleeding or hematoma at the surgical site.
♦ Rapidly escalating swelling accompanied by severe pain.
♦ Fever above 38.5°C persisting despite measures.
♦ Redness, warmth, pus, or foul odor at the incision site.
♦ Sudden breast hardening, distortion, or significant asymmetry.
Important Reminder
The above guidelines are general recommendations. Individual recovery timelines and responses may vary. Always follow your surgeon’s personalized instructions. Contact us anytime for questions, concerns, or discomfort—we’re here to help.
Recovery Milestones After Autologous Fat Transfer Breast Augmentation
1. Weeks 1–2: Strict Rest Period
♦ Avoid any activity that might compress, jostle, or stretch the chest.
♦ Prohibited: Running, jumping, push-ups, chest-expanding exercises, lifting >2–3 kg, or carrying children.
♦ Avoid tight bras or underwire bras; wear only soft, supportive, wire-free bras as directed.
♦ Sleep on your back; never side- or stomach-sleep to prevent putting pressure on the fat.
♦ Gentle indoor walking (5–10 min/session) is permitted; avoid bending, quick turns, or raising arms overhead.
2. Weeks 3–4: Gradual Light Activity Resumption
♦ Slowly resume low-intensity daily activities (e.g., walking, light housework—avoid mopping or heavy lifting).
♦ Still Prohibited: Chest muscle training (bench press, push-ups, dumbbell flys); high-impact sports (jump rope, aerobics, ball games); any posture causing breast jostling or pressure.
♦ Continue wearing supportive bras 24/7 unless otherwise instructed.
♦ Begin gentle walking; gradually increase activity level.
3. Months 1–2: Progressive Recovery Phase
♦ If cleared at follow-up, initiate very light upper limb activities (e.g., static yoga stretches avoiding pectoral engagement).
♦ Avoid high intensity chest training or vigorous exercise.
4. Months 2–3: Fat Stabilization Period
♦ Some fat cells have established vascular connections, but absorption/remodelling continues.
♦ Begin very light upper-body strength training (resistance bands, light shoulder exercises), avoiding direct pectoral stimulation.
♦ Avoid sudden increases in workout intensity/frequency—allow body time to adapt.
5. Months 4–6: Final Shaping & Stabilization
♦ Fat survival stabilizes; breast shape becomes stable.
♦ Gradually resume regular fitness routines cautiously.
♦ Month 6 is the optimal time to evaluate final results.